
As an Amazon Associate, ConductScience Inc. earns revenue from qualifying purchases
Histology is a routine lab technique used to evaluate the morphology and structure of cells, tissues, and organs under the microscope. Histological studies of biological samples often lead to the establishment of structure/function relationships, which may have diagnostic and prognostic value in the clinical context (Lowe and Anderson, 2015).
Histology is fundamental in biology, medicine, and biomedicine. Classical histological techniques made it possible to observe tissues and cells for the first time and to distinguish between their single components. A remarkable achievement arising from technical advances in histological techniques is the ability to detect disease based on the morphological alterations of cells, or by the observations of pathogenic agents (such as bacteria) in tissue samples. Histology development has thus provided an invaluable diagnostic tool, which is routinely applied in the clinics, to detect diseases such as cancer, neurodegeneration, and even infection (Ross and Pawlina, 2016).
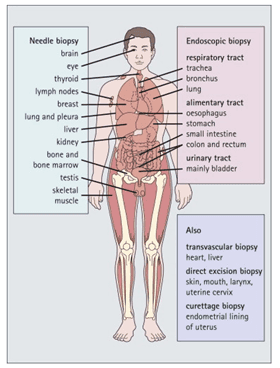
The first step of any histology protocol is the sample collection. In research labs, this may imply collecting cells from cell culture flasks, or tissue isolation from lab animals, such as rodents, fish, or flies. Similarly, in humans, the histological study of any sample starts with a sample collection from the human body, either by biopsy or blood collection (Figure 1). In all cases, samples are processed in such a way that the final cell/tissue sample for staining is fixed onto a glass slide for further staining.

Figure 1: Histology in diagnostic medicine. It is now possible to obtain small samples from many areas of the body through various techniques. Histological examination of such samples is an increasingly important and direct way of diagnosing disease. (Image credit: Lowe and Anderson, 2015)
The vast majority of biological samples need some type of processing before staining and microscopic observation. Specific protocols for sample processing depend on the type of sample and the analysis method. Below is a list of the general steps of a classical histology protocol.
a. Fixation and preservation
In histology, the term fixation refers to the technique of irreversibly fixing the structural elements of the sample and stopping any ongoing biochemical reaction. This avoids sample damage by natural decay and putrefaction and allows for the prolonged preservation of the sample. As a result, the final image after any histology protocol is a snapshot of the sample status at the time of fixation.
Aldehydes are usually used in sample fixation, given their ability to cross-link amino groups, thus preserving the structure of proteins. Alternatively, alcoholic fixation is also used under specific conditions. Alcoholic fixation reduces the solubility of proteins in the aqueous medium, affecting protein structure, which can be a limitation when the goal is to probe samples with antibodies that recognize specific protein motifs.
For classical histology protocols, samples (tissues and/or organs) are fixed in a solution of 4% paraformaldehyde (PFH) and then stored in 70% ethanol until further use. For electron microscopy purposes, sample fixation is performed with glutaraldehyde or heavy metal solutions such as osmium tetroxide and uranyl acetate.
Alternatively, samples may be cryopreserved immediately after collection. Sample cryopreservation takes place at extremely low temperatures, using specific reagents. In cryopreservation, samples are embedded in cryoprotectant reagents, such as dimethyl sulphoxide (DMSO), ethylene glycol, propylene glycol, glycerol, and others, to protect tissue and cellular structures from damage during the protocol. Then, samples are cryopreserved in solid carbon dioxide (-80ºC) or in liquid nitrogen (-196ºC). A major concern during cryopreservation is to ensure a fast freezing process, to avoid sample damage and the formation of water crystals, which may originate artifacts during sample staining.
b. Embedding
Sample embedding is necessary to provide support and allow to cut thin sections. For that, samples are embedded in a thick liquefied material, which becomes rigid after sample embedding, enabling sample sectioning. For most of the traditional histology protocols, samples are embedded in paraffin wax. Paraffin wax embedding follows the next general steps:
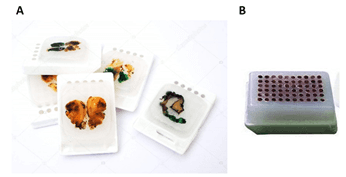
A paraffin block may contain a single biological sample, such as a tumor or a biopsy. Alternatively, tissue microarrays (TMAs) can be assembled into paraffin blocks, by immersing several small tissue samples in the same paraffin block (Figure 2).

Figure 2: Example of paraffin-embedded tissue samples. A. Whole sample; B. Tissue microarray (TMA) (image credits: A. Depositphotos B. Amazon)
c. Sectioning
For tissue samples, sectioning is required to produce thin slices of tissue that are then mounted into glass slides for subsequent staining. Tissue sectioning is performed with a microtome, a specific device equipped with steel, glass, or diamond blades that cuts extremely thin slices of material. For most basic applications, sections of 5 – 15 µm are obtained (light microscopy). When high-resolution images are required, for example, in electron microscopy (EM), tissue sections must be even thinner, up to a maximum of 150 nm thick sections (Ross and Pawlina, 2016). Learn more about sample sectioning and how to operate a microtome.
d. Staining
Tissues and cells have little contrast under light or fluorescence microscopy. Thus, staining techniques have been developed to increase the contrast between biological structures. A myriad of reagents is available for tissue and cell staining, and for morphological studies (find histology and cytology reagents here). Below, you find a list of the most frequent staining methods and their respective applications.
Hematoxylin / Eosin (H&E): (available staining kit here)
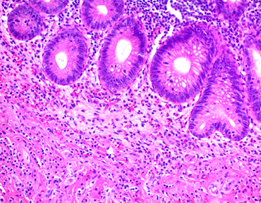
This is probably the most widely used technique in morphological studies. In pathology, H&E staining is used to evaluate cell and tissue morphology, lymphoid infiltration, tissue degeneration, etc. in cancer and neurodegenerative diseases, among others. Hematoxylin stains nucleic acids in a deep-blue color, while eosin has a pink color and stains proteins in a nonspecific manner (Figure 3).

Figure 3: Hematoxylin and Eosin staining of formalin-fixed-paraffin embedded tissue sections (image credit: Abcam).
Giemsa: (available staining kit here)
Giemsa dyes are usually sold as a mixture of azure, eosin, and methylene blue dyes. Azure and eosin bind cytoplasmic structures, while the basic methylene blue binds to the phosphate groups of DNA molecules, thus conferring contrast between nucleus and cytoplasm. Giemsa staining is routinely used in cytopathology labs to detect parasites, such as malaria, in biological samples (Figure 4 A). It is also used in cytogenetics to perform the G-banding of chromosomes (Figure 4 B). G-banding is a diagnostic tool for the identification of chromosomal abnormalities, such as deletions and translocations, and is a fundamental technique in cancer diagnostic, for example.

Figure 4: A. Trypanosoma blood smear, Giemsa stain (image credit: Merckmilipore); B. Left: Bone marrow morphology and G-banding. Bone marrow smear (Wright-Giemsa, 1,000 ×) showing acute myeloid leukemia (AML) cells. Right: Karyotype of a patient sample at diagnosis of acute myeloid leukemia. A chromosomal aberration is marked by an arrowhead. Image credit: (Saito et al., 2013)
Pearl’s Prussian blue: (available staining kit here)
Perl’s Prussian Blue is commonly used to detect iron deposits in biological samples. The method applies a potassium ferrocyanide solution together with an acid, and in the presence of ferric ions (such as in ferritin and hemosiderin), the Prussian blue pigment is formed within the samples.
Gram staining: (available staining kit here)
Gram is a specific technique to differentiate bacteria based on the different properties of their cell wall. With this method, bacteria are distinguished in Gram+ (cell wall contains a thick peptidoglycan layer that retains crystal violet dye) and Gram-bacteria (cell wall containing a thinner peptidoglycan layer, which does not retain crystal violet, and thus stains in red).
Histochemistry:
In immunohistochemistry (IHC) and immunocytochemistry (ICC), reagents that target specific cellular structures are used. IHC and ICC techniques are routinely used to study protein expression and localization, carbohydrates, lipids, and other cellular components, in academic research, industrial, and clinical labs. Detection can then be made by microscopy, using appropriate reagents. Get a more detailed description of IHC and ICC.
e. Smears
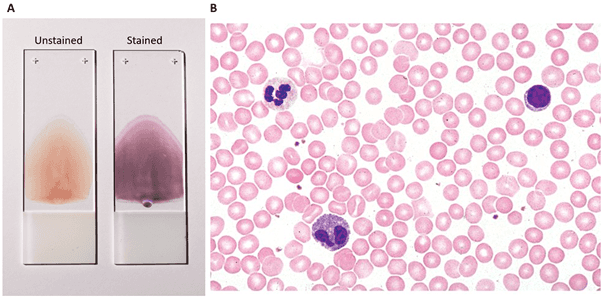
Smears are a fast and specific way of collecting and fixing biological samples for histological processing. Smears are used to analyze blood samples or to directly analyze epithelial cells. Examples of such applications include blood smears and pap-smears, in which epithelial cells are collected directly from the woman’s cervix. In blood smears, a blood drop is spread onto a glass slide, while in pap-smears, cells are collected using a swab and then spread into the slide. In both cases, alcoholic fixation is the standard procedure (Adewoyin and Nwogoh, 2014). Samples can then be stained and observed by light microscopy. This type of technique is routinely used in hospitals for the rapid morphological study of patient cells. The evaluation is done by trained pathologists, which determine whether the cells are normal, or if additional, more accurate exams are necessary, in case of morphological alterations.

Figure 5: Peripheral blood smear: A. Fixed slides containing unstained and stained blood smear (image credit: Coinmac, in Wikipedia); B. light microscopy image of a blood smear stained by H&E (see below), displaying different types of blood cells (image credit: Fisher Scientific).
Light microscopy: for most traditional histology protocols (H&E, Giemsa and Prussian blue staining), light microscopy is used to evaluate the stained samples. This is usually used in pathology and cytopathology to observe morphological features of samples, pathogen invasion (such as parasites and bacteria) or lymphoid infiltration. Figures 3, 4A-B and 5 are classical examples of light microscopy images from histology protocols. Read our Light Microscope article to learn more
Fluorescence microscopy: this is used to analyze samples in which antibodies have been used to detect proteins, carbohydrates, lipids, etc. To generate an image, antibodies are coupled with fluorophores (i.e., molecules that emit fluorescence at specific wavelengths). Using fluorescence microscopy, the samples are irradiated at specific wavelengths, producing an image that will reflect not only the abundance but also the localization of the target molecule. Read our Fluorescence Microscope article to learn more.
Histology techniques are among the gold-standard techniques for the morphological evaluation of biological specimens. From academic to clinical labs, several types of traditional histology protocols are used every day. One of the most important applications of histology techniques is their application in patient diagnosis. When evaluated by experienced pathologists, histological images may provide information on disease staging and progression. However, the application of standard histologic techniques is limited to the study of dead, fixed samples, and the study of living samples is out of scope. Moreover, sample processing is prone to the generation of artifacts, which may introduce bias during microscopic observation. Therefore, the analysis and report of histological specimens must always be performed by more than one experienced pathologist, and the final conclusions must be obtained through consistent and reproducible observations.
