
Today, we all — biologists or not — have an idea about how the brain functions. The advanced techniques and lab procedures have made the knowledge accessible and unlocked many mysteries related to brain functioning.
One such procedure is brain slicing. It’s a process in which parts of the brain are divided using advanced technologies or microtomes in desired plane or orientation.
The process helps scientists to understand the underlying pathophysiological conditions of the brain, its development, and its responses to several stimuli. By using a brain slice in controlled physiological conditions, you can study a synapse or neural circuit in isolation from the rest of the brain.[1]
Furthermore, as the brain slice retains the brain’s 3D structural integrity, one can examine the electrophysiological consequences of drug toxicity.[2]
During the process, the brain is sliced using a tissue slicer. Then, to stimulate the particular brain area and record data, the slice is immersed in artificial cerebrospinal fluid (aCSF).[2]
This article is an exposé on brain slicing, including the directions and planes of slicing, equipment used in the procedure, and the applications of the technique.
Before moving to the directions and orientation of brain slice preparation, have a look at some directional terms. These directions also represent the possible views of different parts of the brain during studies.[3]
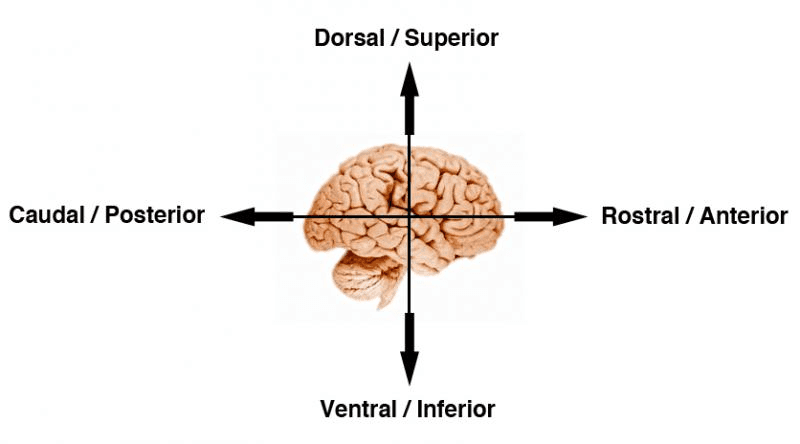
Figure: A schematic diagram of different regions of the brain and their scientific terms.[3]
Furthermore, a 3-dimensional brain has three planes, which also represent the ways a brain can be sectioned for experimental procedures:
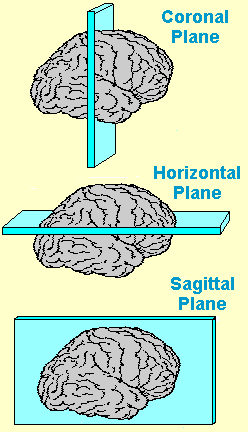
Figure: An illustrative diagram of different planes of the brain.[5]
Brain slice preparation is a high-throughput procedure that requires expertise and knowledge of the equipment, tools, and chemicals to precisely perform the procedure based on experiential requirements.[6]
The Compresstome VF-200 slicing machine is the commonly used slicer in a range of life sciences labs to prepare brain slices including:[6]
The machine uses agarose embedding of the tissue and slight compression to make fine and uniform tissue slices.
Other than the Compresstome VF-200 slicing machine, you also need the following equipment and tools to perform the brain slice procedure:[6]
These are used to house or culture brain slices.[6] It’s of different types, which include:[7]
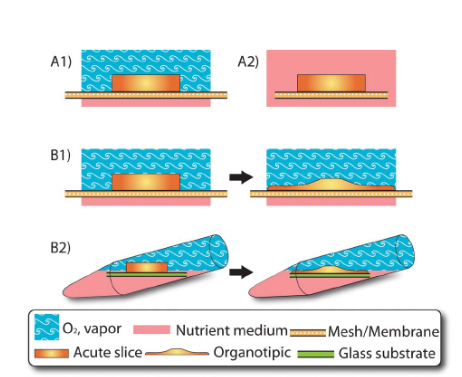
Figure: An illustration of different types of brain slice chambers: (A1) Interface chamber; (A2) submerged slice chamber; (B1) Organotypic slice chambers with interface chamber; and (B2) Organotypic slice chambers in a rotary tube.[7]
Besides these conventional slice chambers, advanced microfluidic devices are also available that provide improved oxygen penetration efficiency and enhance brain slice viability and functions.[7]
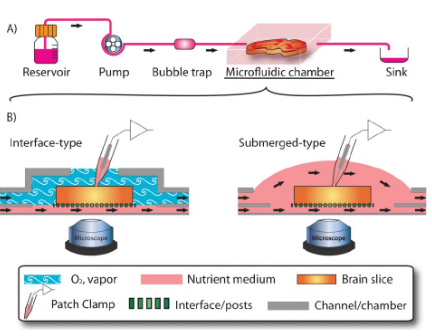
Figure: An illustration of a microfluidic device: (A) integrated into the linear experimental set-up; and (B) combined with conventional slice chambers.[7]
A range of blades are available in the market based on the materials used to manufacture them, such as highly-durable stainless steel, carbon steel feather blades, and ceramic blades.
It includes tools such as fine dissecting “supercut” scissors (for cutting through the skull), fine spatula, heavy-duty spatula, curved blunt forceps, scissors for decapitation, scalpel handle, and 10-number blades.
It includes a large dish filled with Sylgard for pinning anesthetized animals, a 30 mL syringe with 25 5/8 gauge needles, and dissecting pins.
The incubation chamber includes Brain Slice Keeper-4 or any other similar machine. However, it must have a fine gas diffuser stone for infusion of carbogen into the aCSF, a submerged netting for the slices to rest on, and some gentle constant flow to circulate the solution through the slice.
It should be calibrated frequently when in use and the thermocouple should be kept clean.[6]
It should be accompanied by a thermoblock and the temperature should be set at 42°C with the mixing speed at 600 rpm – this maintains the molten state of 1.5% low agarose before usage.[6]
It should always be calibrated before use.
Other than these, others include a carbonate supply machine, electrophysiology rig, blue laser for ChR2 photostimulation experiments, and laser scanning confocal microscope.[6]
Brain slice preparation and usage have several advantages over other conventional techniques, which also increased the implementation of the technique in some experimental studies, such as investigating mammalian CNS activity.
However, some limitations also need to be considered before applying the brain slice preparation and procedure in your lab protocol.
Related Read: Preservation Techniques: Methods for Preserving Tissue Slices
A brain slice is a result of sectioning a particular part of the brain in a specific plane or orientation using a sharp blade. The prepared slice allows us to study underlying pathophysiological conditions, a particular area of the brain and its neural circuitry, and the development of brain tissues and neural networks.
However, there’s a need to develop and introduce affordable technologies that are not labor and time-intensive, and most importantly, do not alter the properties of the tissues to obtain accurate and reliable data.
Though microfluidic technology has the potential to improve brain and neuronal studies, it requires further research to determine its effective applications in that area.
Are you looking for a tissue slice chamber that works in both submerged and interface modes? Check out our acrylic biochemistry dual-channel system.
Get the entire package for up to 50% discount with our Replication program.
DISCLAIMER: ConductScience and affiliate products are NOT designed for human consumption, testing, or clinical utilization. They are designed for pre-clinical utilization only. Customers purchasing apparatus for the purposes of scientific research or veterinary care affirm adherence to applicable regulatory bodies for the country in which their research or care is conducted.