
A microtome is a precision tool used in labs to cut extremely thin sections of different materials. It’s derived from two Greek words mikros, meaning “small”, and temnein, meaning “to cut”.[1]
The microtome is built of three primary parts: the body, knife attachment and knife, and material holder.[1] It slices the embedded material into uniform sections and then is kept on the slide and observed under a microscope for experimental studies.
Without this tool, it is challenging for scientists to observe complex organisms at a single cell layer level. The microtome allows researchers to examine the cells with a clearer view and understand their architecture and mechanisms in the best way possible.
In this article, we will cover the types of microtomes and how you can choose the right one for your lab experiments.
Many types of microtomes are designed to serve a spectrum of applications. Some of them are briefly explained below.[2]
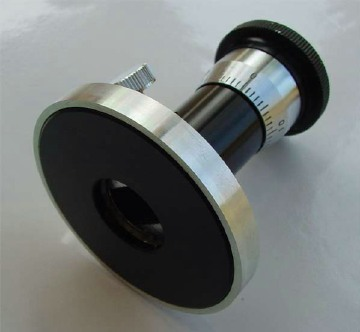
Figure: An image of hand microtome.[2]
Hand microtome is used to prepare thin sections of plant parts, such as stems, leaves, buds, and some animals.[3] It’s the most basic microtome type that allows scientists to prepare the sections by hand better and faster.
Although it’s inexpensive and thus suitable for fieldwork during excursions, school education, practical microscopy courses, and biology amateurs’ practices, it can not be used to prepare extremely thin and uniform sections of tissues.[2]
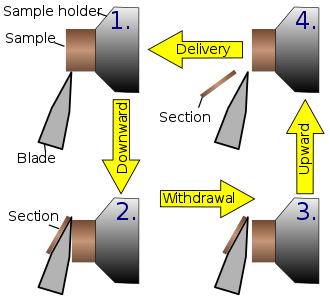
Figure: Working mechanism of the rotary microtome.[4]
It’s the most common and widely used microtome in labs. Here, a knife is fixed in a horizontal state, and moving the handwheel in rotary motion actuates the cutting movement. The device operates in a staged rotary manner so that cutting occurs in conjunction with the rotational motion.[1]
The advantage of this type is that it’s heavier than other microtomes and thus more stable. It can easily cut hard tissues without vibrations, thus, providing serial sections of the given material.
Furthermore, combining the microtome with suitable accessories can cut 0.5 to 2.0-micrometer thin resin sections and paraffin wax blocks.[1]
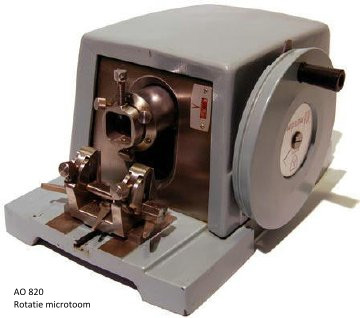
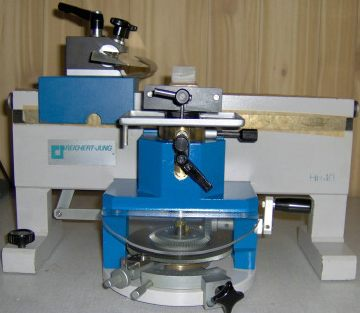
Figure: An image of sledge microtome.[2]
In this microtome, the blade of the tool moves; however, the object to be sliced remains still.[4] The object is placed in a holder, which moves back and forth across a knife to cut the object into multiple sections. Also, the angle between the knife and sample can be adjusted to reduce the pressure applied to the object. It can cut tissues with a thickness range of 1 to 60μm.[4]
The sledge microtome is generally preferred to cut woody parts of the plants and prepare large samples in neuropathology and ophthalmic pathology.
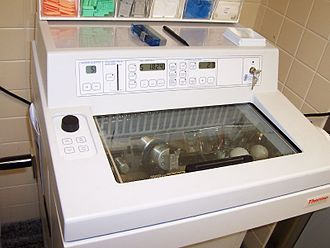
Figure: An image of cryostat microtome.[4]
Cryostat microtome involves using a glass knife to cut the sections of the frozen tissues. By reducing the temperature, the sample’s hardness can be increased by undergoing a glass transition, allowing semi-thin samples to be prepared.[4]
The tool is primarily used for surgical purposes because it requires lesser preparation of tissue than the tools involving paraffin use.[2]
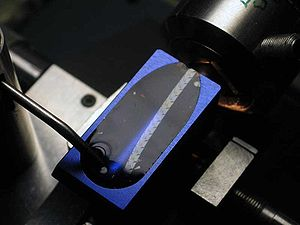
Figure: An image of an ultrathin section ribbon is prepared using an ultrathin microtome.[4]
The microtome is used to prepare ultra-thin samples for electron and light microscopy. Typically, the sections produced by this microtome are 40 to 100 nm thick for electron microscopy and 30 to 50 nm for serial block-face scanning electron microscopy (SBFSEM). The functioning of the device matches that of the rotation microtome.[4]
Choosing the right microtome to prepare suitable quality sections for your experiments is important because using the wrong tool might ruin your sample and, thus, your experiments.
Primarily, the choice of microtome depends on the sample you are working with and the thickness of the slices required for your experimental studies. Below are factors to consider before buying a microtome.[5]
Before buying a microtome for your facility, it’s essential to understand the purpose of your experiments and the samples or specimens you will be working with.[5] As you have learned, there is a range of microtomes with different knife profiles, sizes, shapes, and the ability to cut through soft to hard materials; thus, different experiments require different thicknesses of materials.
For example, electron microscopy requires sections as thin as 40-100 nm, while light microscopy requires a section of 0.5 μm or higher.
The thickness of the sections of your samples is important for microscopy quantification. You can’t obtain clearer details using thicker samples; however, thinner samples might be ruined before being used in the experiment. Thus, choose the microtome that can provide sections that suit your application.[5]
Another factor to consider is deciding what kind of knife you want to adjust in your tool. Different knives are designed to serve different purposes. For example, fixed knives made of steel are suitable for cutting paraffin-wax embedded tissues, while those made of glass are perfect for resin-embedded tissues.[5]
Fixed knives are also built of tungsten carbide, non-corrosive metal, diamond, and sapphire and are cheaper than disposable knives.
The disposable blades are made of polymer, Teflon, titanium nitride (TiN), or ceramic and are suitable to prepare thin sections of any sample, except harder specimens.[5]
The benefits provided by the disposable microtomes are:
The knives used in microtomes come in different forms. And based on their structure they are classified as:[7]
Apart from the shape and sharpness of the knife, its material is another feature that you should consider while purchasing the microtome. They are mostly available in the following materials:[7]
Three types of microtomes are available today, manual, semi-automated, or fully automated. The manual microtome provides much control over the cutting process and is cheaper than the semi-automated and automated microtomes.[5]
However, the automated microtomes provide quality returns on their prices as they produce uniform and faster sections of the materials.
Before purchasing microtomes, ensure that they have multiple safety features or locks on handwheels and cover on knives to protect you from getting hurt from their sharp edges while not working with the tool.[5]
There should also be an object head balance and emergency stop button to prevent knives from dropping. Moreover, there should be sufficient space to insert and remove the blade from its holder.
Below is a list of safety features that you should be looking for while purchasing the microtome:[6]
It’s always recommended to purchase equipment and tools from verified suppliers so that you can always reach out in case of any questions, queries, or emergencies.
Investigate a bit about the supplier, brand, and model of equipment. Also, ensure that the suppliers have qualified manufacturer-compliant engineers to repair the microtome whenever required.[5]
To avoid time-consuming product returns in case of any damages, ensure that your desired microtome comes with a reasonable warranty period or multi-year service agreement options.
Furthermore, ensure that the supplier provides all the appropriate accessories for the microtome when the instrument servicing is required. The unavailability of quality accessories might affect your lab productivity and experiments and cause downtime.
Finally, consider your purchase budget. Lab operations have many and multiple requirements. Therefore, according to your budget you can either purchase automated, being the most expensive; semi-automated, being cheaper than automated but costlier than manual; or manual microtomes, being the cheapest.[5] Besides this, also consider the cost of other individual accessories of the microtomes you desire to purchase.
Microtome is one of the essential tools used in labs to cut extremely thin and uniform sections of different types of specimens. It helps provide a clearer image of the tissues and an in-depth understanding of the organism’s metabolic mechanism.
Scientists have developed a variety of microtomes suited to specific lab applications. They include ultramicrotome, rotary, sledge, hand, saw, and laser microtome.
Hence, before you purchase a microtome, you need to understand the types of microtomes and their functions. Then, determine the applications you require the microtome for, samples you’re working on, and your budget. Furthermore, ensure that the microtome has optimum safety and security features and only buy from a verified supplier.
Choosing the wrong microtome or a low-grade product might not only sacrifice your valuable samples but also ruin your running experiments. Therefore, follow these tips and stay one step ahead in bringing quality to your lab.
Do you need a quality high-grade microtome that allows you cut biological specimens into thin slices? Check out the S700A rotary microtome.
Get the entire package for up to 50% discount with our Replication program.
DISCLAIMER: ConductScience and affiliate products are NOT designed for human consumption, testing, or clinical utilization. They are designed for pre-clinical utilization only. Customers purchasing apparatus for the purposes of scientific research or veterinary care affirm adherence to applicable regulatory bodies for the country in which their research or care is conducted.