


In most types of microscopy, the most complicated and sensitive aspect of the analysis is the preparation of specimens. The visualization of microorganisms using optical microscopy is no exception. Microorganisms are generally transparent, fragile, and highly sensitive to their environments, and for that reason, careful preparation is required to visualize them without significantly perturbing their structure.
In this article, we will discuss some of the most important and useful specimen preparation techniques in modern optical microscopy. First, we will cover the methods used for immobilizing and selectively staining cells or parts of cells. In the second part, we will describe some methods that can be used to visualize living cells and some practical aspects of using an optical microscope to carry out the analysis.
Since microorganisms are mostly transparent, staining can be very helpful in visualizing them, including their internal structures. Staining involves adding a single dye, or sequence of dyes, which selectively attach to parts of the cell either chemically (like an acid-base reaction), or through physical processes (by being trapped inside the cell, for example). Some dyes also improve contrast by changing the nature of the background field away from the cell.
In addition to improving the visualization of cell structures, staining can also be used as a tool to identify unknown organisms based on their reactions to staining procedures. The Gram stain, probably the most important type of staining known in microbiology, is an example of this and will be described in detail below.
In this section, we will first describe the preparation of a smear, which is typically used to generate specimens for staining, then discuss some of the more commonly used staining techniques.
For most staining procedures, the first step involves the preparation of a specimen by making a smear. To summarize, smearing is a simple technique that involves the placement of a small sample of the microorganism on a slide, dispersing it, and then drying and heating it to fix or immobilize the cells onto the slide surface. The procedure also kills the cells. Dispersing and drying the cells enhances the uptake of the dye used in staining, while heat fixing is required to prevent cells from being washed off the slide during staining and subsequent rinsing.
Care is required to generate a specimen of optimal thickness and to not contaminate the specimen or any lab equipment that may be used for subsequent analysis.
There are a number of possible variations on the procedure used for smear preparation, but in general, the following steps can be used [1][2]:
A picture of a finished bacterial smear is shown in Figure 1.
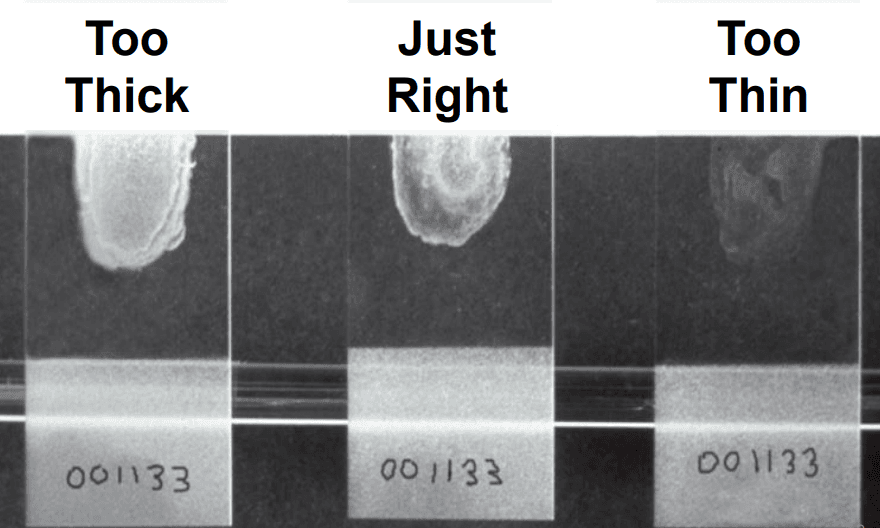
Figure 1: Three bacterial smear samples, reproduced from.[2]
If multiple specimens are being prepared on a single slide, deposit the samples and air dry all of them prior to flaming. Trial and error are sometimes needed to obtain the optimal thickness or concentration of cells in the smear. This can be controlled by diluting with water or saline on the slide, as described in steps 5 and 6, or by obtaining more or less of the sample on the transfer tool in step 6.
There are a number of staining techniques that have been developed over many years for the accurate imaging of specific organisms and cellular structures. Here, we will provide descriptions of the most common and useful. References 1 and 3 provide excellent and exhaustive lists of available stains.
This is a technique that only uses a single stain, and is useful for simply visualizing cells, to determine characteristics like size, shape, and count. In this method, the stain has basic functionality, causing it to become positively charged in a neutral pH medium. Most cells acquire a negative charge under similar conditions, so the stain selectively attaches to the cell surface.
Examples of stains that can be used for this technique include crystal violet, safranin, and methylene blue.
A negative stain works in the opposite way. These stains are acidic, and therefore become negatively charged at a neutral pH. Instead of staining the cells, they are repelled from the cells and attached and stain the rest of the specimen. When using a negative stain, cells appear bright on a dark background.
Nigrosin is a stain that can be used in this way.
Gram staining is a more complex, multi-step technique, but is a powerful method for classifying bacteria.[3] The technique involves exposing the cells to a primary stain, crystal violet, then exposing them to an iodine solution, which forms a complex with the stain. All cells will take up crystal violet and form this complex. Next, the specimen is exposed to a decolorizer, which is either ethanol or a mixture of acetone and ethanol. In some cells, called ‘gram negative’ cells, the decolorizer will dissolve the stain-iodine complex and carry it out of the cell. In ‘gram positive’ cells, the complex cannot pass back through the cell wall and is trapped inside the cell. Finally, a second stain is added to re-stain the gram-negative cells, typically safranin or carbol fuchsin. The second stain will also enter gram-positive cells, but it is lighter in color so the staining in those cells is dominated by the darker purple crystal violet-iodine complex. A schematic summary of the Gram staining procedure, with an example of a stained specimen, is shown in Figure 2.
The staining procedure, therefore, classifies cells based on the reaction of the cell walls to the decolorizing solvent. Gram-positive cells, which show up purple, have a high concentration of sugar-protein complexes in their cell walls, while gram-negative cells, which show up pink or red, have a low concentration of these complexes.
The Gram staining procedure can often lead to equivocal results. For example, if the smear is too thick, this can result in incomplete decolorization due to transport limitations of the decolorizing agent. In other cases, if the culture is too old, results can be variable. Therefore, the most complete guidelines for the staining procedure usually include advice to:
If possible, repeat the same smearing and Gram staining procedure on two additional control samples- one that is known to be Gram-negative, the other known to be Gram-positive.
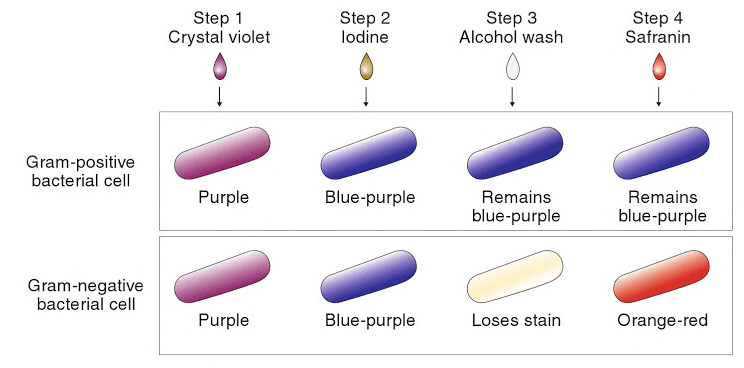
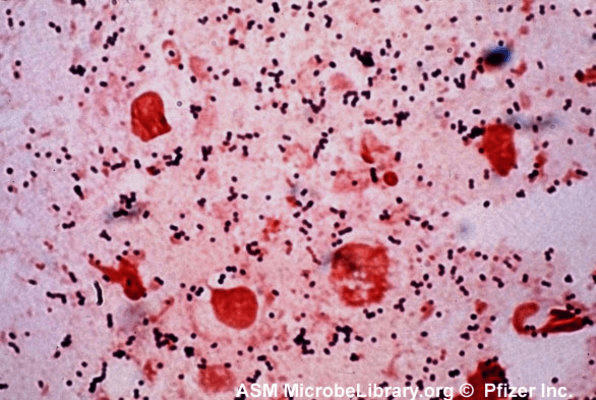
Figure 2: top, a schematic of the Gram staining procedure; [1] bottom, an example of a specimen stained using the Gram procedure.[4]
Acid-fast staining is a similar method to Gram staining but adapted for organisms with significantly nonpolar and impenetrable cell walls.[1] Examples of such organisms are members of the genus Mycobacterium. The thickness and waxy nature of the cell walls of these organisms make it difficult to stain using the standard Gram technique.
In this procedure, the specimen is first exposed to carbol fuchsin and heated (or alternatively, exposed to a lipid solubilizer). This stains the cell. In the second step, the specimen is exposed to an acid-alcohol solution. Only cells with a sufficiently impenetrable cell wall will retain the dye in this step, and these cells are said to be acid-fast. A second counter-stain can then be used to re-stain the decolorized organisms, similar to the Gram staining procedure.
Some microorganisms have one or more small, thin appendages that are used to move the organism around in a liquid. These appendages, called flagella, are far below the resolution limit for optical microscopy, at typically < 30 nm in thickness. Therefore, special staining procedures are necessary to visualize these structures using optical microscopy. One such procedure uses a simple basic stain dissolved in ethyl alcohol.[5] As with other stains for flagella, the technique requires rigorously cleaned microscope slides and otherwise very careful, detail-oriented technique.
An alternative method for visualizing such small structures is the use of electron microscopy.
As discussed above, there are many staining procedures that can be used, all with their own chemistry and step-by-step procedure. As an example of a common procedure, the following steps can be used for Gram staining.[6]
A disadvantage to using the smear/stain technique described above is that it kills and immobilizes the microorganisms, which prevents the analysis of motility and other related properties. By using so-called “wet mount” techniques, the microorganisms can be kept in a liquid environment in which they are alive during analysis.
The simplest type of wet mount method is to place a drop of liquid containing the microorganism onto a slide, then gently place a coverslip over the drop. This method is susceptible to drying, however. A more complex but stabler type of wet mount is the hanging drop.[7] In this method, a liquid droplet with the microorganism is hanging down below the coverslip, with the sample sealed from the atmosphere using a ring of wax or petroleum jelly. An illustration of a hanging drop mount is shown in Figure 3.
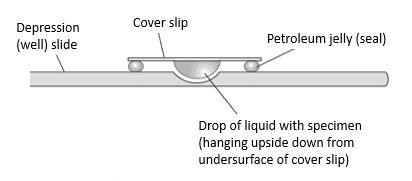
Figure 3: hanging drop mount (side view)[7]
A hanging drop mount can be made using the following procedure:
Analysis of hanging drop samples will sometimes involve judgments of cell motility or the ability of the cells to self-propel. Even non-motile or dead cells can move in a liquid, due to the convective flow of the liquid, or by Brownian motion. So any analysis of cell motility should be done by carefully observing cell movement over time, to ensure any movement is true motility.
A hemocytometer is a special type of microscope slide that can be used for quantitative counting and sizing of cells. It is commonly used to determine the concentration of blood (thus the ‘hemo-’ prefix), sperm, or yeast, but can be used on any type of cell or another particle that can be seen in an optical microscope.
The principle of the hemocytometer is that it consists of chambers that are marked into regions of known volume. The counting chamber, and an example of the marked regions, are shown in Figure 4. By counting the numbers of cells within one or more known volumes, the concentration of cells can be determined (cells per unit volume). A schematic view from the side and top of a hemocytometer is shown in Figure 4.
The device itself, also shown in Figure 4, is a thick microscope slide, with an indented well in the center that serves as the counting chamber, and deeper depressions to capture any overflow of sample liquid. Besides the special slide, a coverslip that is thicker than the standard must be used, so that the surface tension of the liquid under analysis does not deform it.
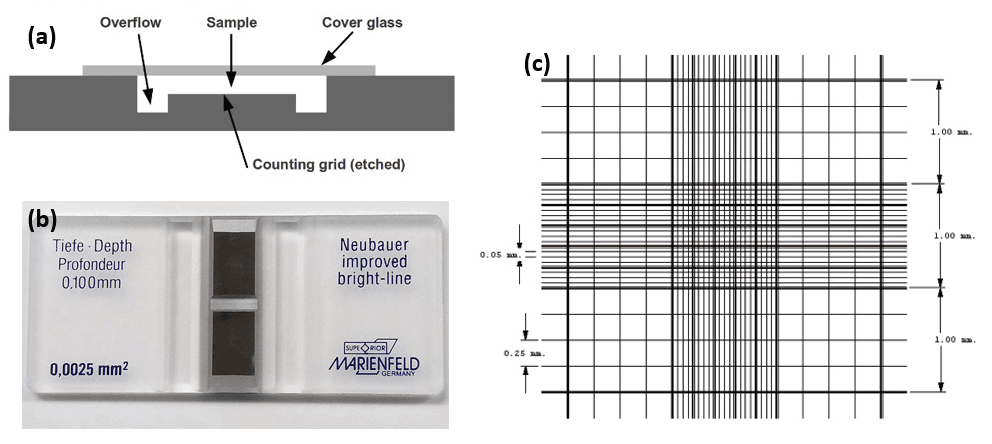
Figure 4: (a) schematic of the side view of a hemocytometer,[8] (b) photo of a commercial hemocytometer slide,[9] and (c) example layout of the etched lines in the counting chamber.[9]
Determining cell concentration using a hemocytometer involves first thoroughly agitating the sample to ensure it is fully mixed, then making the proper dilution. Because the technique relies on visually counting cells, overlapping or agglomerated cells can artificially reduce the measured concentration. So a high dilution must be used if the original sample is very concentrated.
After diluting and placing the sample into the hemocytometer, the next step is to count the cells in a given set of demarcated regions. Enough cells should be counted in order to obtain a statistically significant sample size, which for most analyses is on the order of ~ hundreds of cells. The analyst must also be systematic in whether or not to count cells that lie on a demarcation line. For example, one system is to count cells that line only on the lower or left side of a given area.
An ocular micrometer is an optical element that is placed in the eyepiece of a microscope, which superimposes marks of known pitch onto the magnified image (the pitch is the distance between marks). Ocular micrometers are a subset of a type of optical element known as a reticle; examples of other types of reticles are shown in Figure 5.
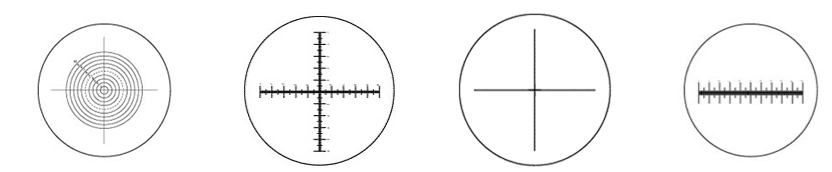
Figure 5: various types of reticles for optical microscopes, including ocular micrometers (2nd and 4th reticles) [10]
By knowing the pitch and the total magnification, the analyst can estimate distances in the field of view and use that to estimate the sizes or other dimensions of microorganisms, or any other specimen under analysis. For example, if an optical micrometer has a pitch of 100 um, and 10X magnification is being used, then the distance between marks on the magnified image is 10 μm (100 um / 10).
However, this approach is often imprecise since the exact magnification and pitch are not known. For this reason, a stage micrometer should be used to calibrate the ocular micrometer. This is a special microscope slide with a printed scale showing absolute distances. The ocular micrometer can be calibrated using this tool by comparing the distance between marks on the ocular micrometer, and marks on the stage micrometer, using various objectives.
In this section, we will describe the steps for the basic operation of an optical microscope. These steps can be thought of as general for any of the specimen preparation techniques described here.

Monday – Friday
9 AM – 5 PM EST
DISCLAIMER: ConductScience and affiliate products are NOT designed for human consumption, testing, or clinical utilization. They are designed for pre-clinical utilization only. Customers purchasing apparatus for the purposes of scientific research or veterinary care affirm adherence to applicable regulatory bodies for the country in which their research or care is conducted.